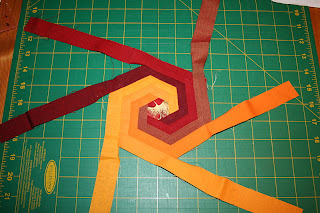
This block involves piecing and applique.
You will need:
central fabric
1" strips of 6 other fabrics
Backing fabric
Firstly cut out a paper hexagon the size that you want the finished centre to be
Hexagon Outline (clipped to polyvore.com)
Line up your first fabric strip against one edge of your hexagon, making sure you have 1" overhang at your starting end and 1/2" at the other end (we will trim later), now the key to this is to sew 1/4" in from the edge of the hexagon so that you leave this unsewn.
Sew your next strip on, this time sew from edge to edge, fold strip back, press and trim off excess
For the 6th strip you need to do things slightly differently as it has to finish under the first strip you attached. Fold back the excess of the first strip and pin to keep it out of the way. Line your 6th strip up along the edge of your hexie and sew. Un-pin your first strip, open it up and lay it flat (as flat as you can as you have sewn a seam over the other end). Sew into place, press to check everything is as it should be, then trim excess.
Trim excess off the outside of the hexie
Repeat the above stages for sewing on strips, making sure to leave extra hanging over the edge for each first strip and not sewing that first 1/4". Continue until your katherine wheel is one set of strips away from the desired size.
For the outer strips keep them much longer than the previous strips. This time when you sew them on, you need to start each one 1/4" in from the edge of the hexie you have created. This will allow you a 1/4" seam allowance along the length of each strip.
Turn the edges of all strips in by 1/4" and press.
You are now ready to sew your Katherine Wheel onto your block. Decide on your block size and Katherine Wheel placement and pin in place. (I forgot to take a picture of it pinned in place so here is a picture of the first Katherine Wheel I made)
Now there are a number of ways that you can do the next stage, you could simply machine stitch it in place, you could turn edge applique it so that no stitches are visible or you could do a quilt as you go method.
I am layering some cotton wadding and a back with mine and will quilt as I sew it in place because I am making mine into a mug rug. I guess how you do yours depends on what yours is going to be.
And here is the first one I made (for the mouthy stitches swap on flickr), just a bit of hand quilting needed
And what about a quick mock up of what a quilt could look like
So there you go, a Katherine Wheel block. If anyone makes one I would love to know, maybe I will start a flickr group for anyone that makes something using one of my tutorials.
Dont forget to come back and link up for Tutorial Tuesday or just check out the tutorials that other people have been writing or using.


10 comments:
This is a really cool design...great job! I love your paper piecing work too...fantastic. Visiting from MonPetitLyons...congrats on the award!
What a fun block! Sooooo many possibilities!
Um, WOW! That's an awesome tute! Visiting from MonPetitLyons, as well. Congrats on your Liebster!
belle-n-bee.blogspot.com
Thank you for writing this up! I love your progress on the swap pouch and am glad I could make my own if I'm not your partner. ;)
Ooh that looks fab!
Nice tutorial, I love this little block and used one similar last summer on my solids quilt, although that one did not have the long tails. Those tails are really lovely and I love the quilting you did around them!
This is a fun block, thanks for the tutorial!
Pinned! xxx
Ahh, here's the tut on this fun design. Thank you!
Great tut...I'm gonna try to make it in the next few days for the Quilt Around the World 2 quilt along.
Post a Comment