So thats my tutorial for the week, how about you, have you used a tutorial or written one of your own, if so link up
Tuesday, January 31, 2012
Tutorial Tuesday No.5
So thats my tutorial for the week, how about you, have you used a tutorial or written one of your own, if so link up
Katherine Wheel Quilt Block Tutorial
I have recently created this for my partner in the mouthy stitches swap and I have had so many lovely comments that I thought I would make it my next tutorial. So here are the instructions on making your own Katherine Wheel block.
This block involves piecing and applique.
You will need:
central fabric
1" strips of 6 other fabrics
Backing fabric
Firstly cut out a paper hexagon the size that you want the finished centre to be
Hexagon Outline (clipped to polyvore.com)
Line up your first fabric strip against one edge of your hexagon, making sure you have 1" overhang at your starting end and 1/2" at the other end (we will trim later), now the key to this is to sew 1/4" in from the edge of the hexagon so that you leave this unsewn.
Sew your next strip on, this time sew from edge to edge, fold strip back, press and trim off excess
Repeat until you have 5 stips sewn on
For the 6th strip you need to do things slightly differently as it has to finish under the first strip you attached. Fold back the excess of the first strip and pin to keep it out of the way. Line your 6th strip up along the edge of your hexie and sew. Un-pin your first strip, open it up and lay it flat (as flat as you can as you have sewn a seam over the other end). Sew into place, press to check everything is as it should be, then trim excess.
Trim excess off the outside of the hexie
Repeat the above stages for sewing on strips, making sure to leave extra hanging over the edge for each first strip and not sewing that first 1/4". Continue until your katherine wheel is one set of strips away from the desired size.
For the outer strips keep them much longer than the previous strips. This time when you sew them on, you need to start each one 1/4" in from the edge of the hexie you have created. This will allow you a 1/4" seam allowance along the length of each strip.
Turn the edges of all strips in by 1/4" and press.
You are now ready to sew your Katherine Wheel onto your block. Decide on your block size and Katherine Wheel placement and pin in place. (I forgot to take a picture of it pinned in place so here is a picture of the first Katherine Wheel I made)
Now there are a number of ways that you can do the next stage, you could simply machine stitch it in place, you could turn edge applique it so that no stitches are visible or you could do a quilt as you go method.
I am layering some cotton wadding and a back with mine and will quilt as I sew it in place because I am making mine into a mug rug. I guess how you do yours depends on what yours is going to be.
And here is the first one I made (for the mouthy stitches swap on flickr), just a bit of hand quilting needed
So there you go, a Katherine Wheel block. If anyone makes one I would love to know, maybe I will start a flickr group for anyone that makes something using one of my tutorials.
Dont forget to come back and link up for Tutorial Tuesday or just check out the tutorials that other people have been writing or using.
This block involves piecing and applique.
You will need:
central fabric
1" strips of 6 other fabrics
Backing fabric
Firstly cut out a paper hexagon the size that you want the finished centre to be
Hexagon Outline (clipped to polyvore.com)
Line up your first fabric strip against one edge of your hexagon, making sure you have 1" overhang at your starting end and 1/2" at the other end (we will trim later), now the key to this is to sew 1/4" in from the edge of the hexagon so that you leave this unsewn.
Sew your next strip on, this time sew from edge to edge, fold strip back, press and trim off excess
For the 6th strip you need to do things slightly differently as it has to finish under the first strip you attached. Fold back the excess of the first strip and pin to keep it out of the way. Line your 6th strip up along the edge of your hexie and sew. Un-pin your first strip, open it up and lay it flat (as flat as you can as you have sewn a seam over the other end). Sew into place, press to check everything is as it should be, then trim excess.
Trim excess off the outside of the hexie
Repeat the above stages for sewing on strips, making sure to leave extra hanging over the edge for each first strip and not sewing that first 1/4". Continue until your katherine wheel is one set of strips away from the desired size.
For the outer strips keep them much longer than the previous strips. This time when you sew them on, you need to start each one 1/4" in from the edge of the hexie you have created. This will allow you a 1/4" seam allowance along the length of each strip.
Turn the edges of all strips in by 1/4" and press.
You are now ready to sew your Katherine Wheel onto your block. Decide on your block size and Katherine Wheel placement and pin in place. (I forgot to take a picture of it pinned in place so here is a picture of the first Katherine Wheel I made)
Now there are a number of ways that you can do the next stage, you could simply machine stitch it in place, you could turn edge applique it so that no stitches are visible or you could do a quilt as you go method.
I am layering some cotton wadding and a back with mine and will quilt as I sew it in place because I am making mine into a mug rug. I guess how you do yours depends on what yours is going to be.
And here is the first one I made (for the mouthy stitches swap on flickr), just a bit of hand quilting needed
And what about a quick mock up of what a quilt could look like
So there you go, a Katherine Wheel block. If anyone makes one I would love to know, maybe I will start a flickr group for anyone that makes something using one of my tutorials.
Dont forget to come back and link up for Tutorial Tuesday or just check out the tutorials that other people have been writing or using.
Sunday, January 29, 2012
Sundays Sewing Space: Im a Ginger Monkey
Feeling nosey? Ready for a snoop? This week Katy from Im a Ginger Monkey has kindly agreed to show us around her studio. Katy is currently running the Swoon a long and im loving seeing these blocks pop up everywhere, its such a gorgeous block. Head over here to see some things to make you swoon.
Lets check Katy's space out
Wow Katy, what an amazing dream space, who else would imagine having a skate ramp for the kids in your studio!
Thank you Katy for letting us have a rummage around. Im loving those shelves stuffed with fabric, the cool tins and boxes for organising bits and pieces and the coke rug. Cant wait to see what ends up filling those hoops.
Dont forget to head back later in the week for the linky parties Tutorial Tuesday and on the 1st Feb for To Do First, hopefully we can get organised together
Lets check Katy's space out
Where is your Sewing Space?
I rent a small studio in a media centre about 15 minutes drive from where I live, it's in the basement of an old mill, it's only tiny, and there's no natural light. It's a bit like a cave, I guess, but it's mine and I can lock the door and know I'm not going to get disturbed when I'm there.
What 3 words do you feel best describes it?
quiet, calming, mine. It's nothing fancy, but the fact it's quiet and mine is the most important thing. I love to go there, even if it's just for a half hour a day. It helps me relax and chill out.
Where do you keep your fabric stash and how do you organise it?
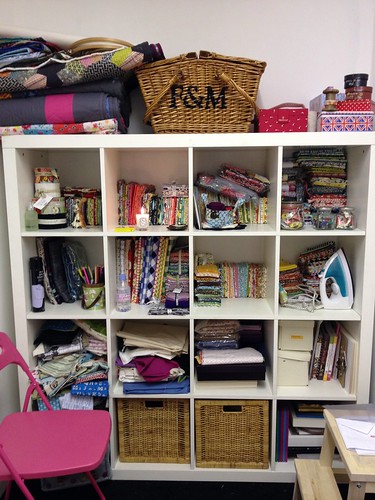
My fabric is stacked on an ikea shelving unit, although I really need to be more organised as a far amount has crept home and is starting to clutter up the house again (much to husband's annoyance). I organise by collection rather than colour - I find it's easier to find what I'm looking for that way. I tend to remember fabrics better by which collection they were in and when I need something specific I can find it much faster that way.
Do you have any top tips to do with work spaces?
Keep it tidy. It's more inspiring when it's not a complete pig sty of a mess. You can go right at it without having to tidy stuff away before you start. I'm not a naturally tidy person so it's tough to keep that rule, but it is something I stick to - in my studio at least (at home, not so much). Make it homely, make it a place you want to go to. And buy the biggest desk you can fit in there.
Oh, if I could have my dream workspace it would be in a huge loft with masses of open space and natural light. There'd be bare brick everywhere, a huge design wall, a massive tailor's cutting table and haberdashery cabinets. I'd live there too, but the studio would be separated from the main living space by huge sliding doors. We'd have a lift down to the street. And the kids could ride their bikes around the whole loft. Maybe there'd be a skate ramp in one corner, and a recording studio for my husband too. Obviously it'd be in New York, or maybe East London somewhere. To say I've planned my dream space out in amazingly fine detail is an understatement. I actually dream about it. I can picture it exactly in my head...I probably should stop day dreaming about it, because there's no way it's happening unless I win the euromillions....
Thank you Katy for letting us have a rummage around. Im loving those shelves stuffed with fabric, the cool tins and boxes for organising bits and pieces and the coke rug. Cant wait to see what ends up filling those hoops.
Dont forget to head back later in the week for the linky parties Tutorial Tuesday and on the 1st Feb for To Do First, hopefully we can get organised together
Saturday, January 28, 2012
Winter Stitching Check in
Its time to check in and see how we have all got on with our planned sewing for the winter, we are about half way through now so lets see if i'm halfway through my list!
1) Pouch for the Pretty Little Pouch swap - Done
And I got this, isn't the embroidery wonderful, such a beautiful pouch from Leila (needle and dime)
2) Pincushion for Sewn Spaces Swap - Done
3) Cushion for Brit Quilt Pillow Fight - Done
And a little something extra, a travel sewing wrap
And I received this amazing one in return from Ethne at Flaming Stitches, it is unbelievably stunning, she is a absolutely amazing FMQer, you have to check out her work, serious talent! The colours and design are so beautiful, these pictures do not do it justice at all
4) 2 Pressies for birthdays at the crafty campers - one done and given, one in the pipeline, due to be given mid Feb
5) Make block for a friends birthday and assemble the quilt made up of blocks from each of the crafty campers - done and given
6) Catch up on Skill builder - Not touched, no progress, seriously behind!
7) Catch up on Farmers Wife blocks - Same as above
8) New Christmas Stockings for the 4 of us - All started, 1 finished, 2 almost finished, 1 needs quite a lot of work and 1 tutorial written
9) Quilt for my sister - no progress
10) Quilt for my other sister - no progress
11) Bee Blocks for Piece Bee With You - Up to date
12) Bee Blocks for Sew Bee Joyful - Need to make this months block before I am late but other than that am up to date
13) Blocks for 3x6 Bee - Done and posted
14) Finish our living room curtains - no progress, am reluctant to finish them as we are moving
15) Finish our 4 roman blinds for the living room - 2 finished, 2 nearly finished
16) Create fabric for the handprinted fabric swap - done, posted and received some lovely things in return
Extra things that were not on the list that I have made since Winter stitching started:
Cushion to go with the collaborative wallhanging I put together
Cushion for crafty campers christmas pressie swap
Cushion for Sew Mama Sew giveaway
Pouch for Sew Mama Sew giveaway
Cushion for my sisters Christmas pressie - No picture taken
3 x earphone pouches for Christmas pressies - No pictures taken
Union jack for my mums Christmas pressie so she can re-upholster a foot stool
Signed up for the Mouthy Stitches Swap - I've started designing for this and loving how fun this swap is
Signed up for round 2 of For the Love of Solids - I've picked out my fabrics and drawn up my design, very excited to make it up, not sure I will want to give it away although they are not normally my colours at all
Made superhero fancy dress for 20 children
Made a quilted zipper pouch and written a tutorial
Entered a fashion design competition and made a dress for my entry
Made 2 charity string blocks and a block for the back of the charity quilt
Made an improv quilt for myself
Sorry for the massive post, cant believe quite how productive I have been, still a lot to do though, especially with my new Tutorial Tuesday linky party and writing a tutorial for it each week, time consuming but fun!
Check back on Tuesdays for Tutorial Tuesday and dont forget that To Do First is starting up on the 1st of Feb, hopefully it will keep us all organised so head back then to link up
Oooh and I started Sundays Sewing Space - a peek into some great bloggers work spaces
1) Pouch for the Pretty Little Pouch swap - Done
And I got this, isn't the embroidery wonderful, such a beautiful pouch from Leila (needle and dime)
2) Pincushion for Sewn Spaces Swap - Done
A sausage dog, I designed (I hope to put up a free pattern for this soon)
And I got this cute toadstool from Ella (shimmy blister), aren't those pins adorable!3) Cushion for Brit Quilt Pillow Fight - Done
And a little something extra, a travel sewing wrap
And I received this amazing one in return from Ethne at Flaming Stitches, it is unbelievably stunning, she is a absolutely amazing FMQer, you have to check out her work, serious talent! The colours and design are so beautiful, these pictures do not do it justice at all
4) 2 Pressies for birthdays at the crafty campers - one done and given, one in the pipeline, due to be given mid Feb
5) Make block for a friends birthday and assemble the quilt made up of blocks from each of the crafty campers - done and given
6) Catch up on Skill builder - Not touched, no progress, seriously behind!
7) Catch up on Farmers Wife blocks - Same as above
8) New Christmas Stockings for the 4 of us - All started, 1 finished, 2 almost finished, 1 needs quite a lot of work and 1 tutorial written
9) Quilt for my sister - no progress
10) Quilt for my other sister - no progress
11) Bee Blocks for Piece Bee With You - Up to date
12) Bee Blocks for Sew Bee Joyful - Need to make this months block before I am late but other than that am up to date
13) Blocks for 3x6 Bee - Done and posted
14) Finish our living room curtains - no progress, am reluctant to finish them as we are moving
15) Finish our 4 roman blinds for the living room - 2 finished, 2 nearly finished
16) Create fabric for the handprinted fabric swap - done, posted and received some lovely things in return
Cushion to go with the collaborative wallhanging I put together
Cushion for crafty campers christmas pressie swap
Cushion for Sew Mama Sew giveaway
Pouch for Sew Mama Sew giveaway
Cushion for my sisters Christmas pressie - No picture taken
3 x earphone pouches for Christmas pressies - No pictures taken
Union jack for my mums Christmas pressie so she can re-upholster a foot stool
Signed up for the Mouthy Stitches Swap - I've started designing for this and loving how fun this swap is
Signed up for round 2 of For the Love of Solids - I've picked out my fabrics and drawn up my design, very excited to make it up, not sure I will want to give it away although they are not normally my colours at all
Made superhero fancy dress for 20 children
Made a quilted zipper pouch and written a tutorial
Entered a fashion design competition and made a dress for my entry
Made 2 charity string blocks and a block for the back of the charity quilt
Made an improv quilt for myself
Sorry for the massive post, cant believe quite how productive I have been, still a lot to do though, especially with my new Tutorial Tuesday linky party and writing a tutorial for it each week, time consuming but fun!
Check back on Tuesdays for Tutorial Tuesday and dont forget that To Do First is starting up on the 1st of Feb, hopefully it will keep us all organised so head back then to link up
Subscribe to:
Posts (Atom)